
Help page

JSONBuddy Help

How to convert CSV files to JSON or XML

Preview CSV input and output, set the required import options, then verify the generated JSON or XML document.

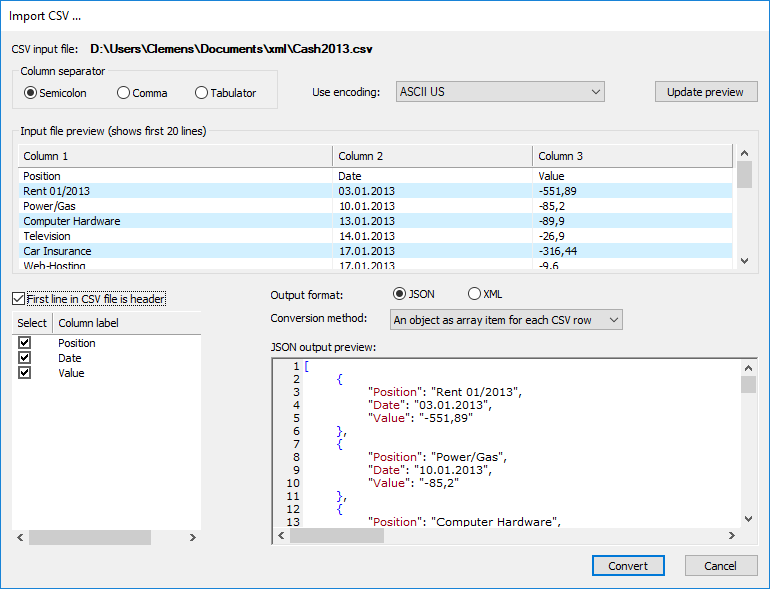
JSONBuddy for Windows CSV conversion dialog with input and output previews
Authentic Help evidence of the CSV conversion workflow and its previews.

Prepare CSV input

  1. Select a known CSV file in the current File Explorer workflow.
  2. Open the current CSV conversion command.
  3. Review the input preview and choose the delimiter, encoding, and header treatment that match the file.
  4. Choose JSON or XML output and inspect the resulting preview.
  5. Convert a small representative input before processing a full data set.

Verify the generated document

The historical Help describes editable column labels, immediate preview changes, and several output structures. Confirm current options and names in the Windows release, then open the output as a new document and check well-formedness, intended shape, and representative values before saving or sharing it.

Related tasks

Review import choices before processing the whole file

Column separators and encodings can make a CSV preview appear plausible while shifting data into the wrong columns. Compare several rows, including quoted values, empty cells, and any non-ASCII text, with the source file. When a header is present, confirm that it is being treated as labels rather than data.

Choose an output structure that matches the consuming system, then validate a converted JSON sample or inspect the generated XML hierarchy before converting a full collection. Keep the sample and documented option choices with the result so the conversion can be repeated.

For recurring imports, record the delimiter, encoding, header rule, output shape, and a checked preview row. Reuse those decisions only after confirming that the next source follows the same convention.

Review an empty row and quoted field too.